iPad-ak ez du keinu egiten: Kernel-aren hutsegitea bidaltzean trabatuta? Saiatu irtenbide hauek
iPad-a gure eguneroko bizitzan ezinbesteko zati bihurtu da, lanerako, entretenimendurako eta sormenerako gune gisa balio duena. Hala ere, edozein teknologia bezala, iPad-ak ez dira akatsetatik salbu. Erabiltzaileek aurkitzen duten arazo frustragarri bat "Kernel bidaltzen" fasean trabatu egiten da keinuka edo firmware-instalazioan. Akats tekniko hau hainbat arrazoirengatik gerta daiteke, softwarearen ustelkeriatik firmware bertsio bateraezinetaraino. Artikulu honek zure iPad-eko "Kernelaren hutsegitea bidaltzeko" arazoa konpontzeko irtenbide praktikoak aztertzen ditu, baita iOS sistemaren akats konplexuak erraz kudeatzeko diseinatutako tresna indartsua ere.
1. Nola konpondu iPad-ek ez du kentzen kennelaren hutsegitea bidaltzean?
iPad bat "Nukleoa bidaltzeko" fasean trabatu egiten denean, kernel-a gailura kargatzeko prozesuak huts egin duela adierazten du. Hau izan daiteke:
- Firmware bertsio bateraezina.
- Software deskarga hondatuta edo osatu gabea.
- Keinu-tresna zaharkituak.
- Sistemaren akatsak edo hardware arazoak.
Hona hemen arazo hau konpontzeko saia zaitezkeen irtenbide batzuk:
1.1 Egiaztatu firmwarearen bateragarritasuna
Ziurtatu flashean saiatzen ari zaren firmware fitxategia zure iPad modelo zehatzarekin bateragarria dela. Firmware okerra erabiltzeak keinuka akatsak sor ditzake. Egiaztatu firmwarearen bertsioa Appleren webgune ofizialean edo hirugarrenen iturri fidagarrietan.
1.2 Eguneratu zure keinu-tresna
Ziurtatu erabiltzen ari zaren keinu-tresna eguneratuta dagoela. Baliteke zaharkitutako tresnek iPad modelo edo firmware berrienak ez onartzea, keinu-prozesuak huts egitea eraginez. Deskargatu azken bertsioa garatzailearen webgunetik aurrera jarraitu aurretik.
1.3 Erabili beste ordenagailu bat
Batzuetan, arazoa zure ordenagailuaren konfigurazioan dago. Saiatu beste ordenagailu bat erabiltzen software-instalazio berriarekin bateragarritasun-arazoak edo hondatutako sistema-fitxategiak kentzeko.
1.4 Egiaztatu USB kablea eta ataka
USB kable edo atake akastunak keinu-prozesua eten dezakete. Erabili jatorrizko edo kalitate handiko kable bat eta aldatu beste USB ataka batera konexio egonkorra ziurtatzeko.
1.5 Berrabiarazi keinu-prozesua
Keinu-prozesuak huts egiten badu, berrabiarazi hasieratik.
Ziurtatu: Itxi atzeko planoko programa guztiak; Berrabiarazi zure iPad eta ordenagailua; Saiatu berriro prozesua arretaz, argibide guztiak jarraituz.
1.6 Berreskuratu iTunes edo Finder erabiliz
Arazoak jarraitzen badu, saiatu iPad-a berrezartzen iTunes-en (Windows edo macOS Mojave-n) edo Finder-en (macOS Catalina-n eta geroago).
Jarraitu urrats hauek: Konektatu iPad zure ordenagailura > Abiarazi iTunes edo Finder > Hautatu zure gailua eta egin klik
Berreskuratu iPad >
Berretsi ekintza eta utzi prozesua bukatzen.
Kontuan izan metodo honek zure iPadeko datu guztiak ezabatzen dituela, beraz, babeskopiak egin behar dituzu aldez aurretik.
1.7 Berrezarri zure iPad fabrikako ezarpenetara
Berrezartzeak ez badu funtzionatzen, berrezarri iPad-a fabrikako ezarpenetara: Jarri iPad-a Berreskuratzeko modua Appleren gida ofiziala jarraituz > Erabili iTunes edo Finder fabrika berrezartzeko.
2. Konpondu aurreratua AimerLab FixMate-rekin iPad sistemaren arazoak
Goiko metodoetako batek arazoa konpontzen ez badu, baliteke zure iPad-ak sistemaren arazo sakonagoa izatea, irtenbide sendoagoa behar duena. Hau da non AimerLab FixMate sartzen da. AimerLab FixMate iOS / iPadOS sistemaren 200 arazo baino gehiago konpontzeko diseinatutako tresna aurreratu bat da, aditu teknikorik gabe. iOS / iPadOS gailu eta bertsio guztiak onartzen ditu, honako ezaugarriak eskainiz:
- Berreskuratzeko moduan, DFU moduan, abio-zikloetan edo beste arazo batzuetan dauden iOS gailuen arazoak konpontzea.
- Eguneratze eta keinuka akatsak konpontzea.
- Datuak galdu gabe konponketak egitea.
- Hasiberrientzako egokia den interfaze atsegina.
Jarraitu urrats hauek AimerLab FixMate erabiliz iPad-a "Kernel-akatsa bidaltzeko" konpontzeko:
1. urratsa: Deskargatu zure OSrako FixMate instalatzailea estimatua, eta gero instalatu zure ordenagailuan pantailako argibideei jarraituz.
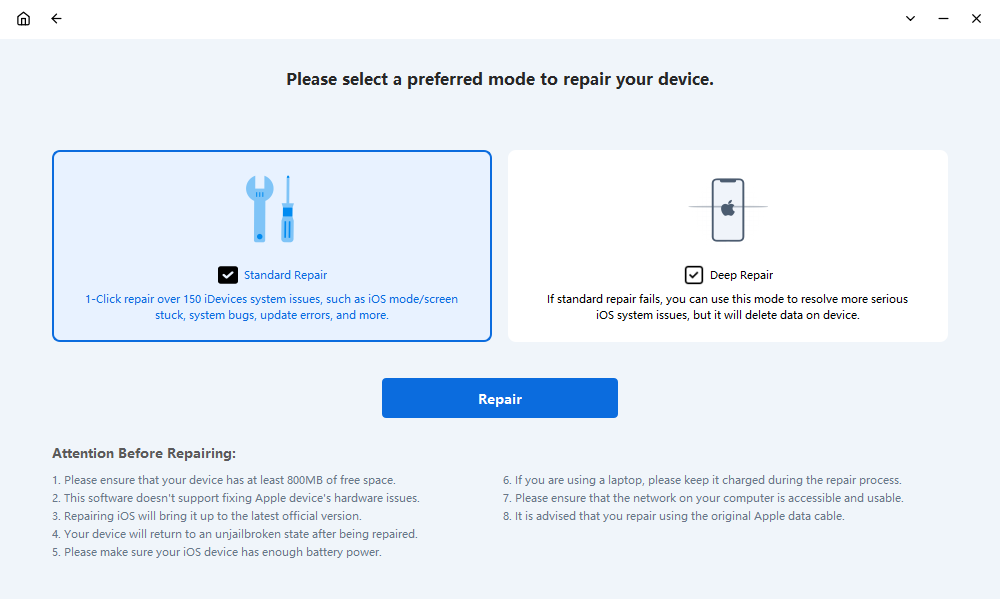
2. urratsa: Konektatu iPad-a compoter-era, ondoren abiarazi FixMate, egin klik Hasi interfaze nagusian eta hautatu Konponketa estandarra datuak galtzea ekiditeko.

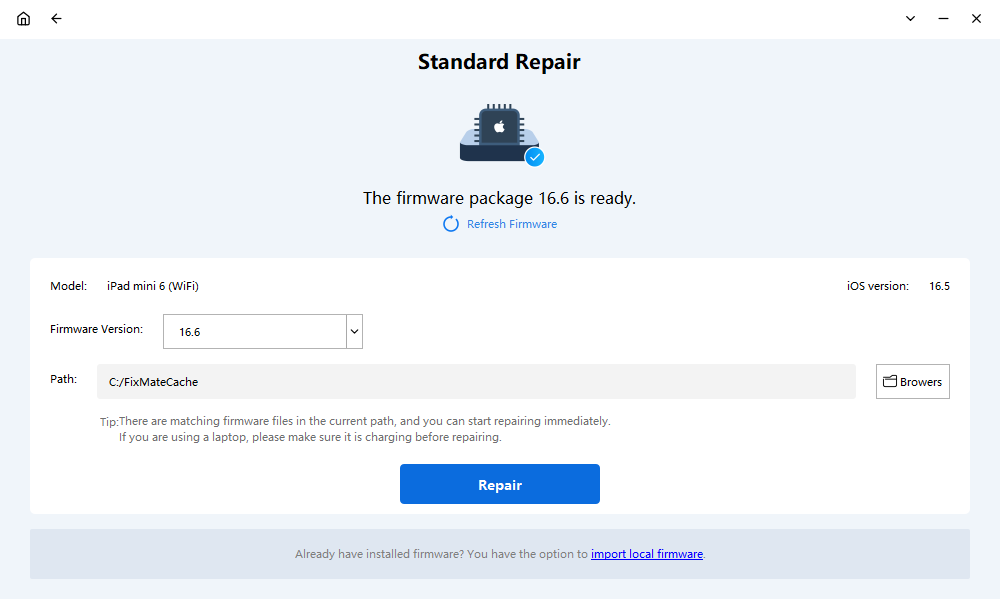
3. urratsa: FixMate-k automatikoki detektatuko du zure iPad modeloa eta firmware-bertsio bateragarriak erakutsiko ditu, hautatu azken bertsioa eta egin klik firmware paketea deskargatzen hasteko.

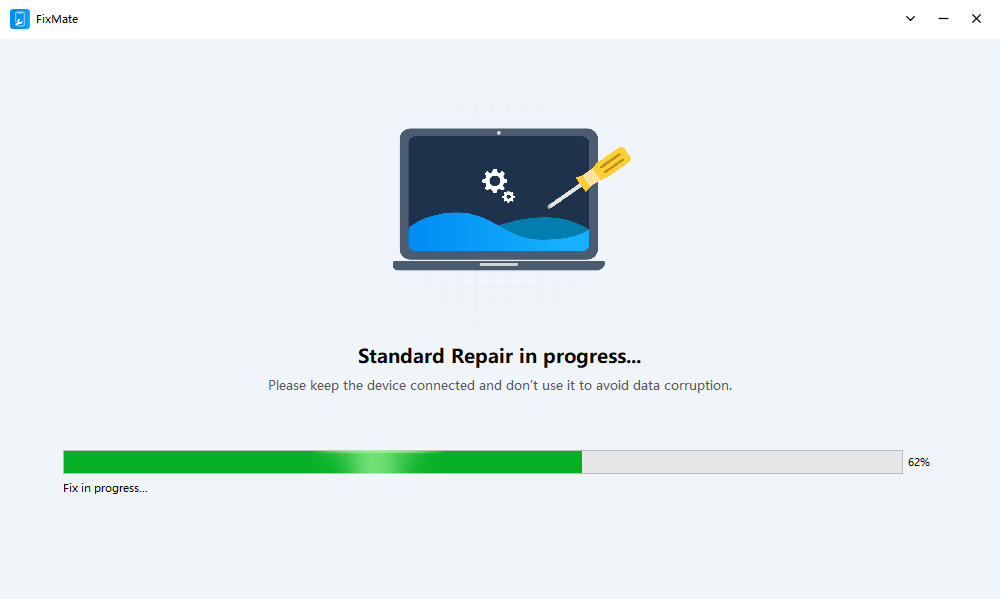
4. urratsa: firmwarea deskargatu ondoren, sakatu Hasi konponketa, eta FixMate-k zure iPad sistema konponduko du eta "Kernel hutsegitea bidaltzeko" arazoa konponduko du.

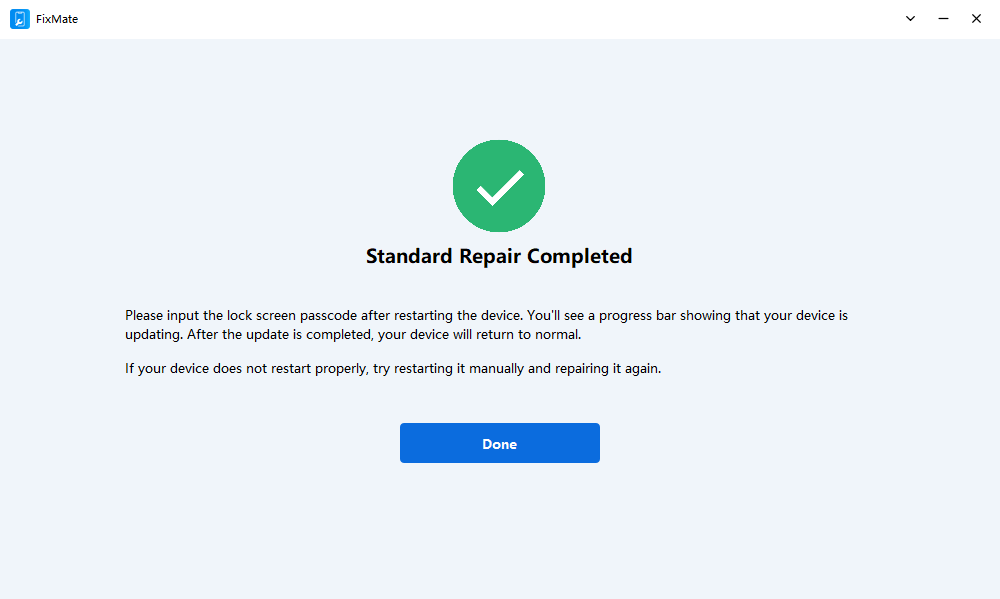
5. urratsa: FixMate konponketa amaitzen duenean, zure iPad berrabiaraziko da eta arazoa konpondu beharko litzateke.

3. Ondorioa
Flashean zehar "Nukleoaren hutsegitearen bidalketa" fasean trabatuta egotea esperientzia frustragarria izan daiteke. Hala ere, goian azaldutako metodoekin, arazoa modu eraginkorrean konpondu dezakezu. Firmwarearen bateragarritasuna egiaztatzetik zure iPad-a iTunes edo Finder bidez leheneratu arte, urrats hauek arazoa konpontzeko irtenbide praktikoak eskaintzen dituzte.
iOS sistemaren arazo aurreratu eta burugogorretarako, AimerLab FixMate azken irtenbide gisa nabarmentzen da. Interfaze erabilerraza, arrakasta-tasa handia eta arazoak datuak galdu gabe konpontzeko gaitasunarekin, ezinbesteko tresna da iPad jabe guztientzat.
Akats iraunkorrak edo iPad sistemaren beste arazo batzuen aurrean bazaude, deskargatu
AimerLab FixMate
gaur eta berreskuratu zure gailuaren kontrol osoa.
- Nola konpondu iPhone 75 errorea?
- Nola aurkitu pasahitzak iPhone iOS 18an?
- Zergatik ez du nire iPhoneak jotzen? Konpontzeko irtenbide eraginkor hauek erabili
- Nola konpondu Nire iPhonearen kokapen okerra aurkitu?
- Hegazkin moduak kokapena desaktibatzen al du iPhonean?
- Nola eskatu norbaiten kokapena iPhone batean?
- Nola faltifikatu Pokemon Go iPhonean?
- Aimerlab MobiGo GPS Kokapen Spoofer-en ikuspegi orokorra
- Nola aldatu kokapena zure iPhonean?
- IOSerako GPS kokapen faltsuen 5 faltsuak
- GPS kokapena bilatzailea definizioa eta Spoofer iradokizuna
- Nola aldatu kokapena Snapchat-en
- Nola aurkitu/partekatu/ezkutatu kokapena iOS gailuetan?


